exp-lookit-video
Overview
Video display frame. This may be used for looking measures (looking time, preferential looking, etc.) as well as for brief filler between test trials or for displaying videos to older children or parents.
(Note: this frame replaced a now-deprecated exp-lookit-video frame, now called exp-lookit-composite-video-trial.)
This is very customizable: you can…
position the video wherever you want on the screen, including specifying that it should fill the screen (while maintaining aspect ratio)
choose the background color
optionally specify audio that should play along with the video
have the frame proceed automatically (
autoProceed), or enable a Next button when the user can move onallow parents to press a key to pause the video (and then either restart when they un-pause, or move on to the next frame)
What it looks like
Specifying trial duration
There are several ways you can specify how long the trial should last. The frame will continue until ALL of the following are true:
the video has been played all the way through
requireVideoCounttimesthe audio has been played all the way through
requireAudioCounttimes
requiredDurationseconds have elapsed since beginning the video
You do not need to use all of these. For instance, to play the video one time and then proceed, set
requireVideoCount to 1 and the others to 0. You can also specify whether the audio and video should loop (beyond
what is necessary to reach the required counts).
After the required number of video play-throughs, the video will either freeze or continue looping (depending on the
loop property of your video parameter). Likewise, the audio will either stop or continue looping after
the required number of audio play-throughs.
Recording
Video (and audio if provided) start as soon as any recording begins, or right away if there is no recording starting.
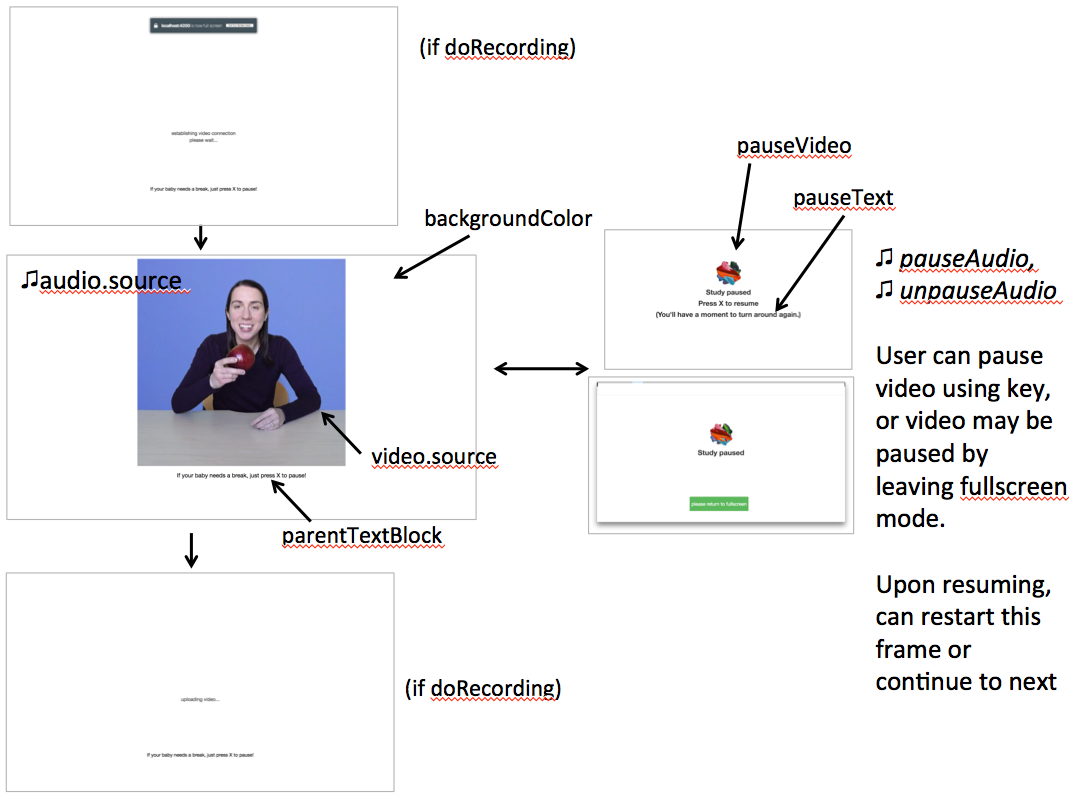
Pausing
This frame supports flexible pausing behavior due to the use of pause-unpause mixin. See that link for more detailed information about how to adjust pausing behavior.
If the user pauses using the pauseKey (space bar by default), or if the user leaves fullscreen mode, the study will be paused. You can
optionally disable either type of pausing; see pause-unpause mixin. While paused, the video/audio are stopped and not
displayed, and instead a pauseImage or looping pauseVideo and some pausedText are displayed. Audio can be played upon pausing and
upon unpausing.
Upon unpausing, either this frame will restart (default) or the study can proceed to a frame of your choice (see the
frameOffsetAfterPause parameter in pause-unpause mixin.
If doRecording is true and you are recording webcam video during this frame, that recording will stop when the study
is paused. If you are doing session-level recording, you can optionally stop that upon pausing; if you do that, you
will probably want to send families back to an exp-lookit-start-recording frame upon unpausing.
Display
This frame is displayed fullscreen; if the frame before it is not, that frame needs to include a manual “next” button so that there’s a user interaction event to trigger fullscreen mode. (Browsers don’t allow us to switch to FS without a user event.)
Specifying where files are
Several of the parameters for this frame can be specified either by providing a list of full URLs and file types, or
by providing just a filename that will be interpreted relative to the baseDir. These are: audio
(source property), pauseAudio, unpauseAudio, pauseVideo, and video (source
property). See the expand-assets mixin tool that this frame uses.
More general functionality
Below is information specific to this particular frame. There may also be available parameters, events recorded, and data collected that come from the following more general sources:
the base frame (things all frames do)
Examples
This frame will play through a central video of Kim introducing an apple two times, then proceed.
 "play-video-twice": {
    "kind": "exp-lookit-video",

    "video": {
        "top": 10,
        "left": 25,
        "loop": false,
        "width": 50,
        "source": "cropped_apple"
    },
    "backgroundColor": "white",
    "autoProceed": true,
    "parentTextBlock": {
        "text": "If your child needs a break, press the space bar to pause!"
    },

    "requiredDuration": 0,
    "requireAudioCount": 0,
    "requireVideoCount": 2,
    "doRecording": true,

    "frameOffsetAfterPause": 0,
    "pauseAudio": "pause",
    "unpauseAudio": "return_after_pause",
    "pauseVideo": "attentiongrabber",

    "baseDir": "https://www.mit.edu/~kimscott/placeholderstimuli/",
    "audioTypes": [
        "ogg",
        "mp3"
    ],
    "videoTypes": [
        "webm",
        "mp4"
    ]
}
This frame plays some audio announcing the next trial while an attention-grabber video loops. It doesn’t record webcam video.
 "announce-next-trial": {
    "kind": "exp-lookit-video",

    "audio": {
        "loop": false,
        "source": "video_01"
    },
    "video": {
        "top": 10,
        "left": 40,
        "loop": true,
        "width": 20,
        "source": "attentiongrabber"
    },
    "backgroundColor": "white",
    "autoProceed": true,
    "parentTextBlock": {
        "text": "If your child needs a break, press the space bar to pause!"
    },

    "requiredDuration": 0,
    "requireAudioCount": 1,
    "requireVideoCount": 0,
    "doRecording": false,

    "frameOffsetAfterPause": 0,
    "pauseAudio": "pause",
    "unpauseAudio": "return_after_pause",
    "pauseVideo": "attentiongrabber",

    "baseDir": "https://www.mit.edu/~kimscott/placeholderstimuli/",
    "audioTypes": [
        "ogg",
        "mp3"
    ],
    "videoTypes": [
        "webm",
        "mp4"
    ]
}
Parameters
- video [Object]
Object describing the video to show. It can have the following properties:
- source:
[String or Array] The location of the main video to play. This can be either an array of
{'src': 'https://...', 'type': '...'}objects (e.g., to provide both webm and mp4 versions at specified URLS) or a single string relative tobaseDir/<EXT>/.- left:
[Number] left margin, as percentage of screen width. If none of left, width, top, and height is provided, the image is centered horizontally at its original size.
- width:
[Number] video width, as percentage of screen width. Note: in general only provide one of width and height; the other will be adjusted to preserve the video aspect ratio.
- top:
[Number] top margin, as percentage of video area height (i.e. 100 = whole screen, unless parent text or next button are shown). If no positioning parameters are provided, the image is centered vertically.
- height:
[Number] video height, as percentage of video area height. Note: in general only provide one of width and height; the other will be adjusted to preserve the video aspect ratio.
- position:
[String] set to ‘fill’ to fill the screen as much as possible while preserving aspect ratio. This overrides any left/width/top/height values.
- loop:
[Boolean] whether the video should loop, even after any
requireTestVideoCountis satisfied.- controls:
[Boolean |
false] whether to display controls allowing the user to seek, pause/resume, and adjust volume.
- audio [Object |
{}] Object describing the audio to play along with video, if any. Can have properties:
- source:
[String or Object] Location of the audio file to play. This can either be an array of {src: ‘url’, type: ‘MIMEtype’} objects, e.g. listing equivalent .mp3 and .ogg files, or can be a single string
filenamewhich will be expanded based onbaseDirandaudioTypesvalues (seeaudioTypes).- loop:
[Boolean] whether the video audio loop, even after any
requireTestAudioCountis satisfied.
- autoProceed [Boolean |
true] Whether to proceed automatically when video is complete / requiredDuration is achieved, vs. enabling a next button at that point.
If true, the frame auto-advances after ALL of the following happen
the requiredDuration (if any) is achieved, counting from the video starting
the video is played requireVideoCount times
the audio is played requireAudioCount times
If false: a next button is displayed. It becomes possible to press ‘next’ only once the conditions above are met.
- backgroundColor [String |
'white'] Color of background. See https://developer.mozilla.org/en-US/docs/Web/CSS/color_value for acceptable syntax: can use color names (‘blue’, ‘red’, ‘green’, etc.), or rgb hex values (e.g. ‘#800080’ - include the ‘#’). We recommend a light background if you need to see children’s eyes.
- restartAfterPause [Boolean |
true] [Deprecated - use
frameOffsetAfterPausefrom pause-unpause mixin directly for more flexible behavior after unpausing.] Whether to restart this frame upon unpausing, vs moving on to the next frame. If set to false, thenframeOffsetAfterPausingis set to 1 and we will proceed to the next frame in order (not using anyselectNextFramefunction) after unpausing. If not set or set to true, the frameOffsetAfterPausing is used.- requiredDuration [Number |
0] Duration to require before proceeding, if any. Set if you want a time-based limit. E.g., setting requiredDuration to 20 means that the first 20 seconds of the video will be played, with shorter videos looping until they get to 20s. Leave out or set to 0 to play the video through to the end a set number of times instead.
- requireVideoCount [Number |
1] Number of times to play test video before moving on.
- requireAudioCount [Number |
0] Number of times to play test audio before moving on
- doRecording [Boolean |
true] Whether to do any (frame-specific) video recording during this frame. Set to false for e.g. last frame where just doing an announcement.
- parentTextBlock [Object |
{}] Text block to display to parent. Can have the following fields, each optional:
- title:
String title to display
- text:
String paragraph of text
- css:
Object object specifying any css properties to apply to this section, and their values - e.g.
{'color': 'gray', 'font-size': 'large'}
Data collected
The fields added specifically for this frame type are:
- videoShown [String]
Source of video shown during this trial. Just stores first URL if multiple formats are offered.
- audioPlayed [String]
Source of audio played during this trial. Just stores first URL if multiple formats are offered.
- hasBeenPaused [Boolean]
Whether the video was paused at any point during the trial
Events recorded
The events recorded specifically by this frame are:
- videoStarted:
When video begins playing (recorded each time video starts if played through more than once).
- currentTime:
[Number] Playback time at start in s. This will be ~0 if video is being started/restarted automatically but may be nonzero if controls were enabled and video playback was paused by the participant.
- videoStopped:
When video completes playback (recorded each time if played more than once) OR is paused, either automatically because study was paused or by participant if controls were shown.
- currentTime:
[Number] Playback time at pause in s.
- audioStarted:
When audio begins playing (recorded each time video starts if played through more than once)
- audioStopped:
When audio completes playback (recorded each time if played more than once)
- trialCompleted:
When trial is complete and begins cleanup (may still then wait for video upload)
- pauseTrial:
When trial is paused
- unpauseTrial:
When trial is unpaused (actually proceeding to beginning or next frame, after unpauseAudio)
- nextButtonEnabled:
When all requirements for this frame are completed and next button is enabled (only recorded if autoProceed is false)
Updating from deprecated frames
Updating an exp-lookit-composite-video-trial (or the old exp-lookit-video) frame
The old version of the exp-lookit-video frame was renamed exp-lookit-composite-video-trial, which was then deprecated
due to stimulus presentation and recording timing issues. If you are using one of these frames, you can update to the current exp-lookit-video frame by separating the
“phases” of the trial out into video and calibration frames.
There are up to four phases in the exp-lookit-composite-video-trial frame, each of which will become a new frame:
An “announcement” with audio and a small attention-getter video. If using, turn this into a separate exp-lookit-video frame.
Calibration where a video is shown at various locations. If using, turn this into an exp-lookit-calibration frame.
An “intro” video which is played once through. If using, turn this into a separate exp-lookit-video frame.
A test video which can be played N times or for N seconds, along with optional audio. If using, turn this into a separate exp-lookit-video frame.
Consider the following trial which has all four phases:
"sample-physics-trial-2": {
    "kind": "exp-lookit-composite-video-trial",
    "baseDir": "https://www.mit.edu/~kimscott/placeholderstimuli/",
    "audioTypes": [
        "ogg",
        "mp3"
    ],
    "videoTypes": [
        "webm",
        "mp4"
    ],

    "attnSources": "attentiongrabber",
    "announceLength": 2,
    "audioSources": "video_02",

    "calibrationLength": 3000,
    "calibrationAudioSources": "chimes",
    "calibrationVideoSources": "attentiongrabber"

    "introSources": "cropped_block",

    "sources": "example_pairing",
    "altSources": "example_pairing",
    "testCount": 2,
    "musicSources": "music_02",

    "pauseAudio": "pause",
    "unpauseAudio": "return_after_pause",

}
We will look at how to create exp-lookit-video frames for the announcement, intro, and test phases. See the
exp-lookit-calibration update guide for how to update the calibration phase.
The announcement phase
First let’s create the frame for the initial announcement. During that video, the attnSources video would play
(centrally, looping) while the audioSources audio played once. The phase lasts for announceLength seconds or
the duration of audioSources, whichever is longer.
We’ll use an exp-lookit-video frame for this.
Change the “kind” to “exp-lookit-video”. Keep the
baseDir,audioTypes, andvideoTypesif using:"sample-physics-announcement": { "kind": "exp-lookit-video", "baseDir": "https://www.mit.edu/~kimscott/placeholderstimuli/", "audioTypes": [ "ogg", "mp3" ], "videoTypes": [ "webm", "mp4" ] }
Add the
videoandaudioobjects, based onattnSourcesandaudioSources. Here we set the video to loop and to take up 20% of the width of the screen:"sample-physics-announcement": { "kind": "exp-lookit-video", ... "video": { "source": "attentiongrabber", "left": 40, "width": 20, "top": 30, "loop": true }, "audio": { "source": "video_02", "loop": false } }
Set the duration of the frame. Here we want it to take at least
announceLengthseconds and we want the audio to play through one time, but we don’t care about the video. We also probably don’t want to record for this short bit:"sample-physics-announcement": { "kind": "exp-lookit-video", ... "requiredDuration": 2, "requireVideoCount": 0, "requireAudioCount": 1, "doRecording": false }
Add in the media to use when pausing/unpausing. You now also have the options to set the key used for pausing, text shown, and whether to restart the trial (see Parameters above), but you can just use the defaults if you want. You’ll just need to copy over
pauseAudioandunpauseAudio, and setpauseVideoto the old value ofattnSources:"sample-physics-announcement": { "kind": "exp-lookit-video", ... "pauseVideo": "attentiongrabber", "pauseAudio": "pause", "unpauseAudio": "return_after_pause" }
Putting it all together, we have:
 "sample-physics-announcement": {
     "kind": "exp-lookit-video",
     "baseDir": "https://www.mit.edu/~kimscott/placeholderstimuli/", // <-- just keep this from your old frame
     "audioTypes": [ // <-- just keep this from your old frame
         "ogg",
         "mp3"
     ],
     "videoTypes": [ // <-- just keep this from your old frame
         "webm",
         "mp4"
     ],

    "video": {
         "source": "attentiongrabber", // <-- "attnSources"
         "left": 40,
         "width": 20, // <-- make this fairly small and center it
         "top": 30,
         "loop": true // <-- video should loop
     },
     "audio": {
         "source": "video_02", // <-- "audioSources"
         "loop": false // <-- audio should not loop
     },

     "requiredDuration": 2, // <-- "announceLength"
     "requireVideoCount": 0,
     "requireAudioCount": 1,
     "doRecording": false,

     "pauseVideo": "attentiongrabber", // <-- "attnSources"
     "pauseAudio": "pause", // <-- just keep this from your old frame
     "unpauseAudio": "return_after_pause" // <-- just keep this from your old frame
}
The intro phase
The intro phase is very similar to the announcement phase, except that we don’t have separate audio (just any audio in the “introSources” video) and we just play the video once through instead of looping it. We’ll start from what the announcement trial looked like above, and just edit the “video” and duration/count parameters:
"sample-physics-intro":
    "kind": "exp-lookit-video",
    "baseDir": "https://www.mit.edu/~kimscott/placeholderstimuli/", // <-- just keep this from your old frame
    "audioTypes": [ // <-- just keep this from your old frame
       "ogg",
       "mp3"
    ],
    "videoTypes": [ // <-- just keep this from your old frame
       "webm",
       "mp4"
    ],

    "video": {
       "source": "example_pairing", // <-- value of "introSources"
       "width": 40,
       "left": 30, // <-- make this a bit bigger and adjust top/width accordingly
       "top": 20,
       "loop": false // <-- don't loop this video
    },

    "requiredDuration": 0, // <-- no required duration this time
    "requireVideoCount": 1, // <-- play the video once through
    "requireAudioCount": 0, // <-- no audio to play
    "doRecording": true, // <-- probably do want to record this (unless you're using session recording)

    "pauseVideo": "attentiongrabber", // <-- "attnSources"
    "pauseAudio": "pause", // <-- just keep this from your old frame
    "unpauseAudio": "return_after_pause" // <-- just keep this from your old frame
}
If you’re doing recording, you may also want to review the video-record mixin parameters which allow you to specify an image/video and text to display while establishing the video connection and uploading the video.
The test phase
Again, the test phase will be similar to the announcement phase, except that we will show the sources video and the
musicSources audio, and the duration is different:
"sample-physics-test": {
   "kind": "exp-lookit-video",
   "baseDir": "https://www.mit.edu/~kimscott/placeholderstimuli/", // <-- just keep this from your old frame
   "audioTypes": [ // <-- just keep this from your old frame
       "ogg",
       "mp3"
   ],
   "videoTypes": [ // <-- just keep this from your old frame
       "webm",
       "mp4"
   ],

  "video": {
       "source": "attentiongrabber", // <-- "attnSources"
       "position": "fill", // <--  maximize while preserving aspect ratio
       "loop": true // <--  video should loop
   },
   "audio": {
       "source": "music_02", // <--  "music_sources"
       "loop": true // <--  audio should loop (although it doesn't have to anymore!)
   },

   "requiredDuration": 0, // <--  if your old frame has "testLength" defined, put it here; otherwise 0
   "requireVideoCount": 2, // <--  if your old frame has "testCount" defined, put it here; otherwise 0
   "requireAudioCount": 0,
   "doRecording": true,

   "pauseVideo": "attentiongrabber", // <--  "attnSources"
   "pauseAudio": "pause", // <--  just keep this from your old frame
   "unpauseAudio": "return_after_pause" // <--  just keep this from your old frame
}
Again, you may want to review the new video-record mixin parameters which allow you to specify an image/video and text to display while establishing the video connection and uploading the video.
The one difference here is that if the participant pauses the study, it will just restart from the beginning of this trial upon unpausing, rather than playing an alternate video.
Putting it together
Because each phase shares a lot of the same parameters - for example, the baseDir and pauseAudio - you may want
to group these together to condense your definitions. For example, you can use a frame group to
put together all four phases (including the calibration phase as discussed here):
"sample-physics-trial": {
    "kind": "group",
    "frameList": [
        { // <--  This is the announcement
            "video": {
               "source": "attentiongrabber", // <--  "attnSources"
               "left": 40,
               "width": 20, // <--  make this fairly small and center it
               "top": 30,
               "loop": true // <--  video should loop
            },
            "audio": {
               "source": "video_02", // <--  "audioSources"
               "loop": false // <--  audio should not loop
            },
            "requiredDuration": 2, // <--  "announceLength"
            "requireAudioCount": 1,
            "doRecording": false
        },
        { // <--  This is calibration
            "kind": "exp-lookit-calibration" // <--  everything else we need is down in commonFrameProperties
        },
        { // <--  This is the intro
            "video": {
               "source": "example_pairing", // <--  value of "introSources"
               "position": "fill" // <--  maximize video on screen (preserving aspect ratio)
               "loop": true // <--  loop this video
            },
            "requireVideoCount": 1 // <--  play the video once through
        },
        { // <--  This is the test
            "video": {
               "source": "attentiongrabber", // <--  "attnSources"
               "position": "fill"  // <--  maximize while preserving aspect ratio
               "loop": true // <--  video should loop
            },
            "audio": {
               "source": "music_02", // <--  "music_sources"
               "loop": loop // <--  audio should loop
            },
            "requiredDuration": 0, // <--  if your old frame has "testLength" defined, put it here; otherwise omit
            "requireVideoCount": 2 // <--  if your old frame has "testCount" defined, put it here; otherwise omit
        }
    ],
    "commonFrameProperties": {
        "kind": "exp-lookit-video", // <--  we'll overwrite this just for calibration
        "baseDir": "https://www.mit.edu/~kimscott/placeholderstimuli/", // <--  just keep this from your old frame
        "audioTypes": [ // <--  just keep this from your old frame
           "ogg",
           "mp3"
        ],
        "videoTypes": [ // <--  just keep this from your old frame
           "webm",
           "mp4"
        ],

        "requiredDuration": 0,  // <--  we'll overwrite this for particular frames
        "requireVideoCount": 0, // <--  we'll overwrite this for particular frames
        "requireAudioCount": 0, // <--  we'll overwrite this for particular frames
        "doRecording": true, // <--  we'll overwrite this for particular frames

        "pauseVideo": "attentiongrabber", // <--  "attnSources"
        "pauseAudio": "pause", // <--  just keep this from your old frame
        "unpauseAudio": "return_after_pause" // <--  just keep this from your old frame

        "calibrationLength": 3000, // <--  just keep this from your old frame. We can put the calibration info here even though it's only used for the calibration frame
        "calibrationAudio": "chimes", // <--  "calibrationAudioSources"
        "calibrationVideo": "attentiongrabber" // <--  "calibrationAudioSources"
    }
}
Updating an exp-lookit-preferential-looking frame
There are up to four phases in the exp-lookit-preferential-looking frame, each of which will become its own frame:
An “announcement” with audio and a small attention-getter video. If using, turn this into an exp-lookit-video frame (see below).
An intro where the “introVideo” is played until it ends (see below).
Calibration where a video is shown at various locations. If using, turn this into an exp-lookit-calibration frame.
A test trial where images or video are displayed. If using images, turn this into an exp-lookit-images-audio frame. If using video (
testVideois defined), turn this into an exp-lookit-video frame (see below).
Consider the following trial which has all four phases:
"sample-trial": {
    "kind": "exp-lookit-preferential-looking",
    "baseDir": "https://s3.amazonaws.com/lookitcontents/labelsconcepts/",
    "audioTypes": [
        "ogg",
        "mp3"
    ],
    "videoTypes": [
        "webm",
        "mp4"
    ],

    "announcementVideo": "attentiongrabber",
    "announcementAudio": "video_02",
    "announcementLength": 2,

    "introVideo": "cropped_book",

    "calibrationLength": 0,
    "calibrationAudio": "chimes",
    "calibrationVideo": "attentiongrabber",

    "pauseAudio": "pause",
    "unpauseAudio": "return_after_pause",

    "testAudio": "400Hz_tones",
    "loopTestAudio": true,
    "testVideo": "cropped_book",
    "testLength": 8,
}
The announcement phase
First let’s create the frame for the initial announcement. During that video, the “announcementVideo” video would play (centrally, looping) while the “announcementAudio” audio played once. The phase lasts for “announcementLength” seconds (the default is 2 if it’s not defined in your frame) or the duration of “announcementAudio”, whichever is longer.
We’ll use an exp-lookit-video frame for this.
Change the “kind” to “exp-lookit-video”. Keep the
baseDir,audioTypes, andvideoTypesif using:"sample-preflook-announcement": { "kind": "exp-lookit-video", "baseDir": "https://s3.amazonaws.com/lookitcontents/labelsconcepts/", "audioTypes": [ "ogg", "mp3" ], "videoTypes": [ "webm", "mp4" ], }
Add the “video” and “audio” objects, based on “announcementVideo” and “announcementAudio”. Here we set the video to loop and to take up 20% of the width of the screen:
"sample-preflook-announcement": {
    "kind": "exp-lookit-video",
    ...
    "video": {
        "source": "attentiongrabber",
        "left": 40,
        "width": 20,
        "top": 30,
        "loop": true
    },
    "audio": {
        "source": "video_02",
        "loop": false
    }
}
Set the duration of the frame. Here we want it to take at least “announcementLength” seconds and we want the audio to play through one time, but we don’t care about the video. We also probably don’t want to record for this short bit:
"sample-preflook-announcement": {
    "kind": "exp-lookit-video",
    ...
    "requiredDuration": 2,
    "requireVideoCount": 0,
    "requireAudioCount": 1,
    "doRecording": false
}
Add in the media to use when pausing/unpausing. You now also have the options to set the key used for pausing, text shown, and whether to restart the trial (see Parameters above), but you can just use the defaults if you want. You’ll just need to copy over
pauseAudioandunpauseAudio, and setpauseVideoto the old value ofannouncementVideo:"sample-preflook-announcement": { "kind": "exp-lookit-video", ... "pauseVideo": "attentiongrabber", "pauseAudio": "pause", "unpauseAudio": "return_after_pause" }
Putting it all together, we have:
 "sample-preflook-announcement": {
     "kind": "exp-lookit-video",
     "baseDir": "https://s3.amazonaws.com/lookitcontents/labelsconcepts/", // <--  just keep this from your old frame
     "audioTypes": [ // <--  just keep this from your old frame
         "ogg",
         "mp3"
     ],
     "videoTypes": [ // <--  just keep this from your old frame
         "webm",
         "mp4"
     ],

    "video": {
         "source": "attentiongrabber", // <--  "announcementVideo"
         "left": 40,
         "width": 20, // <--  make this fairly small and center it
         "top": 30,
         "loop": true // <--  video should loop
     },
     "audio": {
         "source": "video_02", // <--  "announcementAudio"
         "loop": false // <--  audio should not loop
     },

     "requiredDuration": 2, // <--  "announcementLength" or 2 if not defind
     "requireVideoCount": 0,
     "requireAudioCount": 1,
     "doRecording": false,

     "pauseVideo": "attentiongrabber", // <--  "announcementVideo"
     "pauseAudio": "pause", // <--  just keep this from your old frame
     "unpauseAudio": "return_after_pause" // <--  just keep this from your old frame
}
The intro phase
The intro phase is very similar to the announcement phase, except that we don’t have separate audio (just any audio in the “introSources” video) and we just play the video once through instead of looping it. We’ll start from what the announcement trial looked like above, and just edit the “video” and duration/count parameters:
 "sample-preflook-announcement": {
     "kind": "exp-lookit-video",
     "baseDir": "https://s3.amazonaws.com/lookitcontents/labelsconcepts/", // <--  just keep this from your old frame
     "audioTypes": [ // <--  just keep this from your old frame
         "ogg",
         "mp3"
     ],
     "videoTypes": [ // <--  just keep this from your old frame
         "webm",
         "mp4"
     ],

    "video": {
         "source": "cropped_book", // <--  value of "introVideo"
         "left": 30,
         "width": 40, // <--  make this a bit bigger
         "top": 30,
         "loop": false // <--  video shouldn't loop
     },

     "requiredDuration": 0, // <--  no required duration this time
     "requireVideoCount": 1, // <--  play the video once through
     "requireAudioCount": 0, // <--  no audio to play
     "doRecording": true, // <--  probably do want to record this (unless you're using session recording)

     "pauseVideo": "attentiongrabber", // <--  "announcementVideo"
     "pauseAudio": "pause", // <--  just keep this from your old frame
     "unpauseAudio": "return_after_pause" // <--  just keep this from your old frame
}
If you’re doing recording, you may also want to review the video-record mixin parameters which allow you to specify an image/video and text to display while establishing the video connection and uploading the video.
The test phase
Most of the time the exp-lookit-preferential-looking frame would be displaying images rather than video, but if you have
used the testVideo property rather than leftImage, rightImage, etc. then you can convert the test phase to an
exp-lookit-video frame. It is again similar to the announcement except for the media used and duration:
 "sample-preflook-test": {
     "kind": "exp-lookit-video",
     "baseDir": "https://s3.amazonaws.com/lookitcontents/labelsconcepts/", // <--  just keep this from your old frame
     "audioTypes": [ // <--  just keep this from your old frame
         "ogg",
         "mp3"
     ],
     "videoTypes": [ // <--  just keep this from your old frame
         "webm",
         "mp4"
     ],

    "video": {
         "source": "cropped_book", // <--  value of "testVideo"
         "position": "fill", // <--  maximize test video while preserving aspect ratio
         "loop": true // <--  video should loop
     },
    "audio": {
         "source": "400Hz_tones", // <--  value of "testAudio"
         "loop": true // <--  value of "loopTestAudio"
     },

     "requiredDuration": 8, // <--  testLength, if defined; otherwise 0
     "requireVideoCount": 0, // <--  testCount, if defined; otherwise 0
     "requireAudioCount": 0, // <--  don't require playing audio through
     "doRecording": true, // <--  probably do want to record this (unless you're using session recording)

     "pauseVideo": "attentiongrabber", // <--  "announcementVideo"
     "pauseAudio": "pause", // <--  just keep this from your old frame
     "unpauseAudio": "return_after_pause" // <--  just keep this from your old frame
}