exp-video-config-quality
Overview
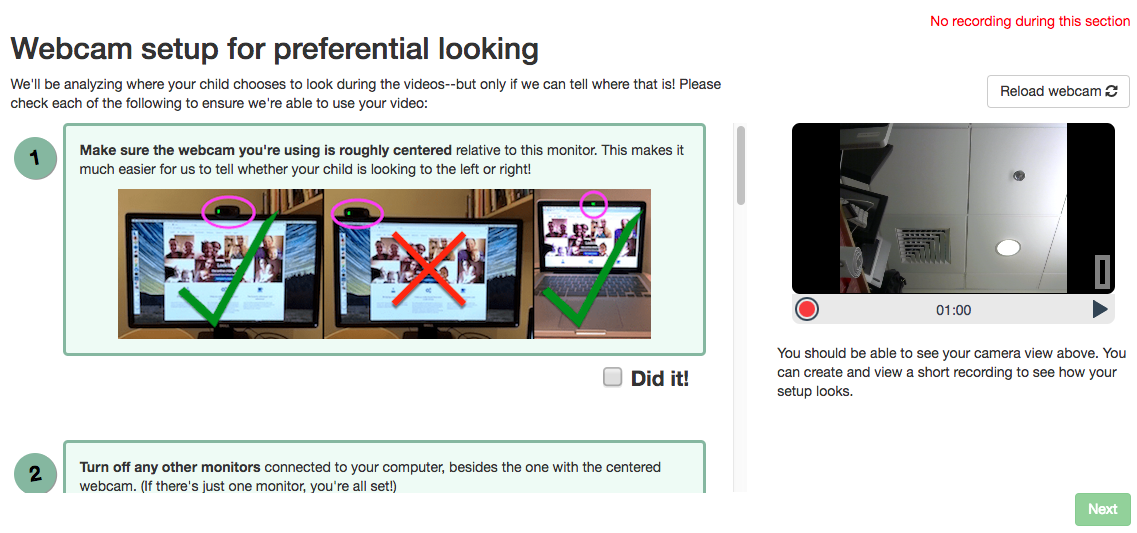
Video configuration frame showing webcam view at right and instructions for checking video quality for preferential looking setup at left. Some default content is hard-coded to provide a reasonable set of instructions for preferential looking setups.
Optionally, participants can be required to check off each item before they can proceed to the next frame. If requireItemConfirmation is true (default), then the ‘next’ button will appear disabled until the participant has checked off all buttons, although if they click it anyway they will get an informative warning and the instructions section will scroll to the first unchecked item.
Participants can also be optionally required to create and view a short recording, e.g. to check their child will be audible or their child’s eyes will be visible in a particular position.
What it looks like
More general functionality
Below is information specific to this particular frame. There may also be available parameters, events recorded, and data collected that come from the following more general sources:
the base frame (things all frames do)
Examples
This frame will show the default hard-coded instructions for setup:
"video-quality": {
    "kind": "exp-video-config-quality"
}
Here the researcher provides specific items to allow customizing the instructions/pictures:
"video-quality": {
    "kind": "exp-video-config-quality",
    "title": "Webcam setup for preferential looking",
    "introText": "We'll be analyzing where your child chooses to look during the videos--but only if we can tell where that is! Please check each of the following to ensure we're able to use your video:",
    "requireItemConfirmation": true,
    "completedItemText": "Did it!",
    "instructionBlocks": [
                {
                    "text": "<strong>Make sure the webcam you're using is roughly centered</strong> relative to this monitor. This makes it much easier for us to tell whether your child is looking to the left or right!",
                    "image": {
                        "src": "https://s3.amazonaws.com/lookitcontents/website/centering.png",
                        "alt": "Example images of using centered external webcam on monitor or built-in webcam on laptop."
                    }
                },
                {
                    "text": "<strong>Turn off any other monitors</strong> connected to your computer, besides the one with the centered webcam. (If there's just one monitor, you're all set!)",
                    "image": {
                        "src": "https://s3.amazonaws.com/lookitcontents/website/monitors.png",
                        "alt": "Example images showing laptop screen turned off if using external monitor and webcam, or external monitor turned off if using built-in webcam and laptop screen."
                    }
                },
                {
                    "text": "Check the lighting by making sure you can <strong>clearly see your own eyes</strong> on the webcam view to the right. You may need to either turn on a light or reduce light coming from behind you.",
                    "image": {
                        "src": "https://s3.amazonaws.com/lookitcontents/website/lighting.png",
                        "alt": "Example images showing good lighting, room too dark, and backlit scene where eyes are not visible."
                    }
                },
                {
                    "text": "If it's practical, <strong>minimize exciting things</strong> that are visible behind or to the side of the screen--for instance, by facing a wall instead of the kitchen. (If this isn't practical for you, don't worry about it--just check the box!)",
                    "image": {
                        "src": "https://s3.amazonaws.com/lookitcontents/website/distractions.png",
                        "alt": "Example images showing a child and puppy next to the computer, versus a computer just on its own."
                    }
                },
                {
                    "text": "During the study, we'll ask that you sit facing away from the monitor, holding your child over your shoulder, like this. (More on that in a moment!) <strong>Make sure the webcam is angled up or down enough that your child's eyes are visible in this position</strong>. If you're not sure if your child's eyes will be visible, you can make a short recording to check!",
                    "image": {
                        "src": "https://s3.amazonaws.com/lookitcontents/website/over_shoulder.jpg",
                        "alt": "Example image showing a dad holding his child looking over his shoulder."
                    }
                }
            ],
        "requireTestVideo": true,
        "showRecordMenu": true,
        "recordingInstructionText": "You should be able to see your camera view above. You can create and view a short recording to see how your setup looks."
}
Parameters
- introText [String]
Text to show as the introduction to the list of things to check. Can include HTML.
- title [String]
Title to display to participant
- requireItemConfirmation [Boolean |
true] Whether to show checkboxes under each instruction item and require participant to check them off to proceed.
- requireTestVideo [Boolean |
true] Whether to require participant to make and view a test video. Ignored if showRecordMenu is false.
- showRecordMenu [Boolean |
true] Whether to display record/replay menu to participant. If false, requireTestVideo value is ignored.
- recordingInstructionText [String]
Text to show below the webcam view. For instance, you might instruct families to make a short recording in the position they will be in for the experiment, and make sure that the infant’s eyes are visible or that the child is audible. HTML is allowed.
- completedItemText [String |
'Did it!'] Text to show next to instructions checkboxes, if participant is required to check off each instruction (see requireItemConfirmation). Ignored if requireItemConfirmation is false.
- instructionBlocks [Array]
List of instruction segments to display to participant. Rendered using exp-text-block.
Data collected
The fields added specifically for this frame type are:
<None>
Events recorded
The events recorded specifically by this frame are:
<None>